The "New Credit Notes" feature under the commerce module is used for creating credit notes for customers. Credit notes are typically issued to customers to provide refunds or credit for returned or faulty goods.
Here's how this feature can be used:
-
Customer Information: Select available customers for the credit note.
-
Bill To & Ship To: This is the billing address of the customer where the credit note will be sent. If the shipping address is different from the billing address, you can specify it here.
-
Street: Enter the street address for shipping.
-
City: Specify the city where the goods will be shipped.
-
State: Enter the state or region.
-
Zip Code: Provide the postal or zip code.
-
Country: Select the country where the goods will be shipped.
Credit Note Details:
-
Credit Note Date: Specify the date when the credit note is issued. In this case, it's "24-08-2023."
-
Credit Note #: This is the unique identifier for the credit note. In this example, it's "CN-000001."
-
Currency: Select the currency in which the credit note amount is expressed.
-
Discount Type: If applicable, choose the type of discount being applied to the credit note.
-
Reference #: You can input a reference number or code for internal tracking purposes.
-
Admin Note: Any additional notes or comments related to the credit note can be added here.
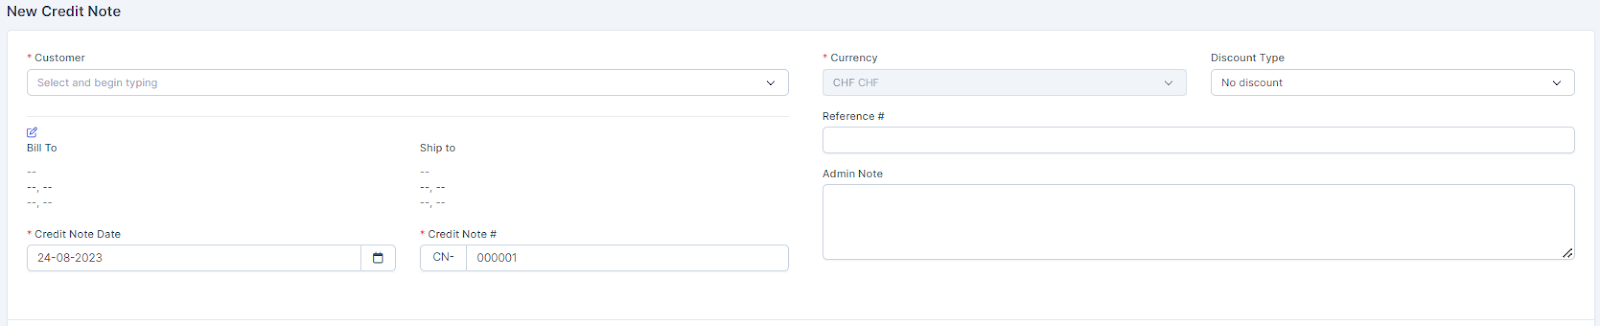
Figure 1 New Credit Note
The "Add New Item" feature within the "New Credit note" section of the commerce module allows you to create and add new items to a sales Credit note. Each item has various attributes associated with it, as described in your provided list.
Here's how you would use this feature step by step:
-
Item Description: Enter a brief description of the item you're adding. This description should give a clear idea of what the item is.
-
Long Description: If needed, provide a more detailed and comprehensive description of the item. This can help provide additional information to clients or colleagues.
-
Rate - CHF (Base Currency): Specify the rate of the item in CHF (Swiss Francs) or the base currency of your system. This is the initial price before any taxes or discounts are applied.
-
Tax 1 and Tax 2: If there are multiple tax levels applicable to this item, select the appropriate tax rates from the available options. Tax 1 and Tax 2 could represent different tax percentages or categories.
-
Unit: Choose the unit of measurement for the item. This could be items, hours, kilograms, etc. It helps provide clarity on how the item is quantified.
-
Item Group: Categorize the item by assigning it to a specific group or category. This grouping can help with organization and filtering in the future.
Actions
Save: To save the item upon checking all mandatory items
Cancel: Nothing will happen, pop-up will cancel.

Figure 2 Add New Item for credit note